

Shop TRQ on 1AAuto.com
Radiator Fan Clutch
Shop TRQ on Amazon
Radiator Fan Clutch
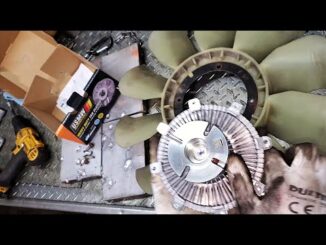
This video shows you how to install a new radiator fan clutch from TRQ on your 2005-2021 Nissan Frontier (4.0L V6). The radiator fan clutch relies on a temperature sensitive spring and a viscous fluid to operate effectively. When worn, it could stick and spin too fast, or stay loose and not spin enough. If the fan spins too early, or not enough, you could face too low or too high coolant temperatures, which could be problematic.
Estimated installation time for a professional technician is approximately: 1 hour 24 minutes
This repair was done on a 2012 Nissan Frontier S 4.0L Crew Cab Pickup 4-Door 4WD Automatic and the process should be similar on the following vehicles:
2005 Nissan Frontier
2006 Nissan Frontier
2007 Nissan Frontier
2008 Nissan Frontier
2009 Nissan Frontier
2010 Nissan Frontier
2011 Nissan Frontier
2012 Nissan Frontier
2013 Nissan Frontier
2014 Nissan Frontier
2015 Nissan Frontier
2016 Nissan Frontier
2017 Nissan Frontier
2018 Nissan Frontier
2019 Nissan Frontier
2020 Nissan Frontier
2021 Nissan Frontier
Tools you will need:
• Flat Blade Screwdriver
• Phillips Bit in a Ratchet
• Phillips Head Screwdriver
• Pry Bar
• 10mm Wrench
• 10mm Socket
• 8mm Socket
• Heater Hose Removal Tool
• Needle nose pliers
• Needle nose pliers
• Pliers
• Push Pin Pliers
• 3/8 Inch Drive Ratchet
• Ratchet
• Torque Wrench
• Gloves
• Safety Glasses
• Drain Pan
• Rubber Mallet
Subscribe:
Check out our playlist:
Nissan Frontier 2nd Generation 2005-2021:
📱 Download the TRQ Auto Repair App for more videos, torque specifications, and car repair information:
⚠ DISCLAIMER:
While TRQ strives to make the information provided in this video as accurate as possible, it makes no claims, promises, or guarantees about the accuracy, completeness or applicability of the content. No information contained in this video shall create any expressed or implied warranty or guarantee of any particular result. All do-it-yourself projects entail some risk. It is the sole responsibility of the viewer to assume this risk. TRQ is not responsible or liable for any loss damage (including, but not limited to, actual, consequential, or punitive), liability, claim, or any other injury or cause related to or resulting from any information posted in this video.

√ Watch the Video
√ Buy The Part at 1A Auto https://1aau.to/m-Shop-TRQ-Parts
√ Do it Yourself
√ Save Money
Wow. I didnt realize all those components had to come off. Im almost afraid to let a shop do this work. Their bound to miss putting something back on.
Top notch teacher! And a pretty decent mechanic!! 😉
Electric fan? I thought the engine fan was mechanical and not electrical.
Gracias, me gustó ese video, así voy a arreglar la mía igualito y de misma año